
One of the parts of your mountain bike that doesn’t get much thought are your axles. It plays a major part in the ability to be out shredding the trails and having a blast.
In this post, we are going to dive in and explain what types of axles there are, how to know what size you have, how to maintain them, and cover some of the common problems.
What is an axle on a bike?
On Mountain Bikes as well as your BMX, Gravel or even road bike, You have two axles that allow the wheels to stay on your bike. The axle runs through the hub on your wheel and is attached to the dropouts on the fork and rear frame of the bike.
When I first got into Mountain Biking, I never really gave much thought to the axles on my bike. There wasn’t an issue until I go the 2017 Specialized Fuse Expert and rushed to get the front tire during a downpour with tragic results. More on this later…
Like me, most people don’t even give these a second thought as they have always been part of the anatomy of bikes. As bike companies are constantly innovating and upgrading the standards sometimes it is easy to get confused or even totally lost when it comes to learning more.
What type of axle do I (you) have?
The first thing for Mountain Bikers to do is find out exactly what kind of axle they are running in order to understand what your options are. There are two types of Axles; Quick Release and Thru-axles (which come as standard or boost).
If you are ready to check out some of the most common axles, check them out here.
Quick Release Axles
There are several types of quick-release axles; quick-release skewer axles and quick-release thru-axles. The skewers were more common back in the earlier days prior to some of the advancements in mountain biking we are seeing nowadays.
Quick Release Skewer Axles
Quick Release Skewer Axles where Patented by Tullio Campagnolo in 1933 after losing a race due to a wingnut failure in a 1927 race. (https://en.wikipedia.org/wiki/Tullio_Campagnolo). These are found on bikes with open fork ends.
This style can still be found on some of the big box store bikes as well as the lower end bikes you may find online. For example, the Mongoose Alta I bought back in 2005 came with skewer axles both front and rear.
Looking for mountain biking related gift ideas? Check out our article on Mountain Bike Gift Ideas: Pre-ride, Post-ride, Accessories & Unique.
I never had any issues with the skewers on this bike for the 10 years that I had owned and ridden often however I didn’t ride as much as I probably could have, especially pre-kids.
One of the pros of running Quick Release skewers is that they are pretty inexpensive as you can see in the examples below.
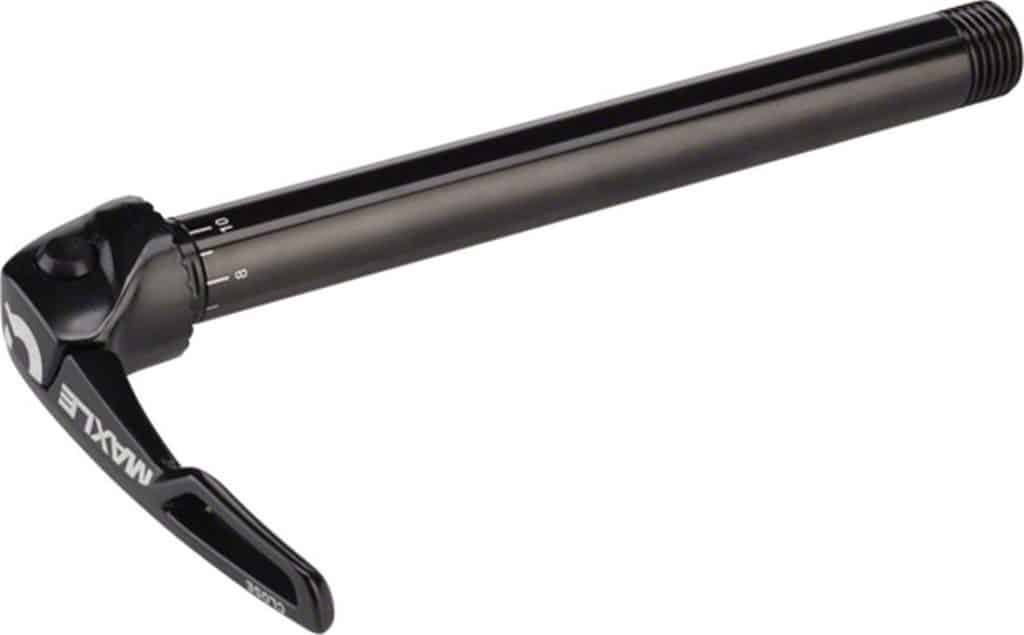
Quick Release Thru Axles
Quick Release Thru Axles still allow riders to quickly remove tires but they are stronger as they bolt directly into the frame without the use of a tool.
Prior to getting my new bike rack, I replaced my bolt-on thru-axle with a Quick Release thru-axle.
The main reason for this was that on my old bike rack, I had to remove the front wheel to prevent potential damage because of the geometry of the new bike as opposed to my old Mongoose Alta.
The constant removal of the front axle led to an incident during a downpour at the end of a ride when I was rushing to get out of the rain and on the road. More about that later in the problems section of this post.
Thru Axles (non-quick release)
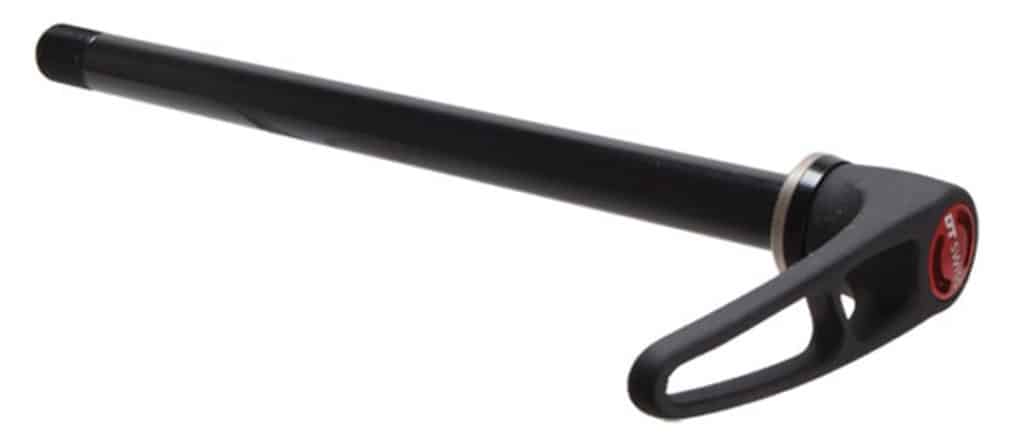
There are two types of Thru-axles which are Standard and Boost. Boost is used with the oversized tires in order to allow the wheel to have a beefier spoke setup.
Some thru-axles have nuts on the outsides of the frames while others are bolted into groves in the frame itself.
Boost
Common questions regarding Mountain Bike axles
What size Mountain Bike axle do I have?
The easiest way to determine what the size of your mountain bike axle is is to look at the axle head itself. In most instances, you can find it on the axle itself,
If it isn’t located on the head of the axle you might find it on the body of the axle.

On the off chance that it isn’t located on the head or body of the axle, review the specs of your mountain bike either online or in the documentation you received when you bought the bike.
Not all of the literature online for your bike will give you the axle size information but you should see the type of fork you have on your bike.
If there is nothing in the listing of the fork on your bike specs, take a look at the Hub Specs because the information is sometimes located there. For example, when you look up my Specialized Fuze You see the following info listed for the bike.

Simply take the fork name of your bike and input it into Google. You can look on the site for the brand of Fork, like RockShocks or Magnum to find your series and/or model.
What are the Common Sizes of most mountain bike axles?
As mountain bike technology continues to improve these sizes will continue to change over time. The most common sizes of most axles are shown in the table below based on the Style/Brand of Bike.
| Bike | Front Axle | Rear Axle |
| Santa Cruz 5010 | 15 x 110mm Boost | 12 x 148mm Boost |
| Pivot Trail 429 | 15 x 110mm | 12 x 157mm Super Boost Plus |
| Santa Cruz Chameleon | 9 x 100mm | 12 x 148mm |
| Santa Cruz Nomad | 15 x 110 mm Boost | 12 x 148 mm Boost |
| IBIS Mojo | 15 x 110mm BOOST thru-axle | 12 x 148mm BOOST thru-axle |
| Spartan 29 NX Eagle Mountain Bike | 15 x 110mm Boost | 12 x 157mm Super Boost Plus |
| Pivot Mach 4 | 15 x 110mm Boost | 12 x 148mm Boost |
| Yeti Cycles SB100 | 15 x 110mm Boost | 12 x 148mm Boost |
How Do You Measure Mountain Bike Axles
If you are still struggling to find out what size of axle you are running you can simply measure it yourself. You can do this using a ruler, tape measure or like I did with this Micrometer.
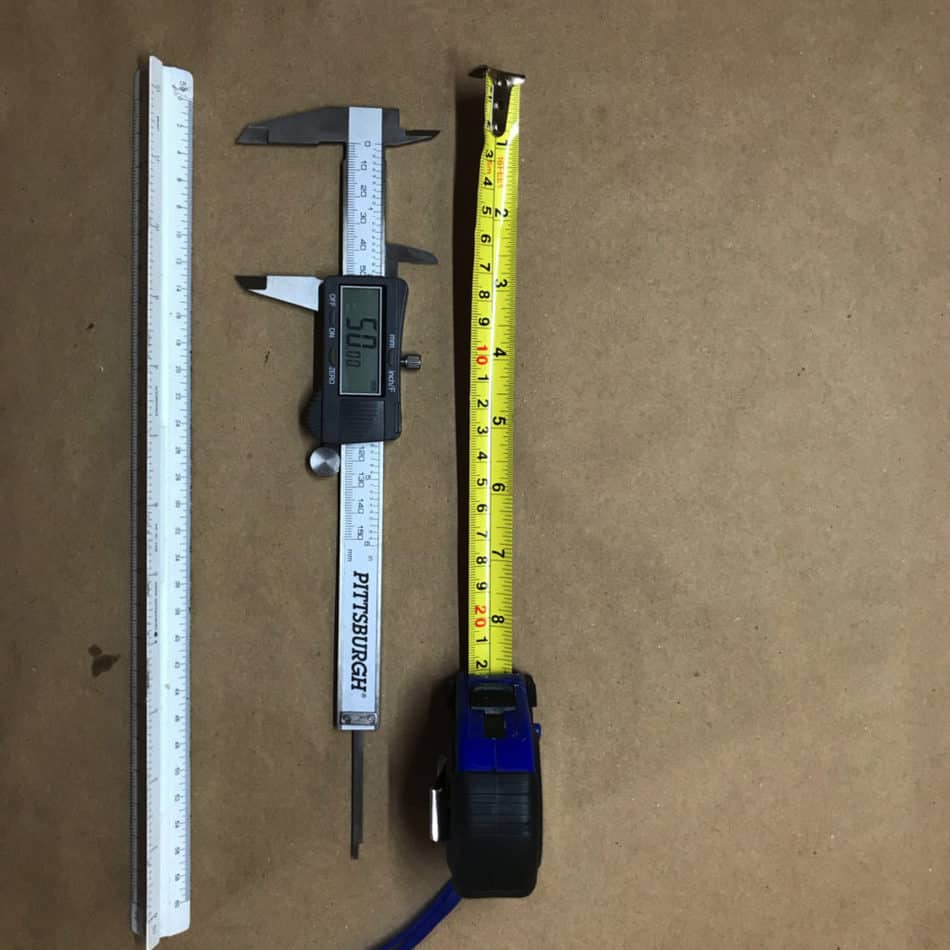
Obviously you don’t need the Micrometer but whatever you plan on using, will need to help you simply calculate to mm’s.
Axle diameter
The simplest way for measuring this is to use a micrometer and place the axle between the tips like the picture above. I found this one on amazon and it has served me well.
Standards
As you can see from the table listed above, the common front axle size is 15 x 110mm with the rear axle either being 12 x 148mm Boost or 12 x 157mm Super Boost Plus.
This however obviously depends on the bike you buy. If you buy a bike from a big box store versus a local bike shop the price of the bikes will be different.
This is due to the different components used which could lead to different types and sizes of axles.
Common Problems with Mountain Bike axles
Problems you may encounter (some self-inflicted)
As mentioned earlier in this post, I made a rookie mistake due to rushing my bike onto my rack so I could get out of the rain and head home. As I tried to rush the front tire off my bike in order for the front tire not to potentially contact the road I did it. I inserted the Allen key but only partially and took an aggressive spin. The axle that I was running stripped and I had to limp home worrying about every bump along the way home.
How to remove a thru-axle with a stripped head
This could make some a bit squeamish but in order to remove the bad thru-axle with the stripped head, you are going to need to perform some surgery. If you aren’t handy and you don’t want to chance it and ruin your bike then take it to your LBS.
First, you need to get the right tools. In my case, I needed a flat tip screwdriver and a hammer. I also grabbed some old car towels.
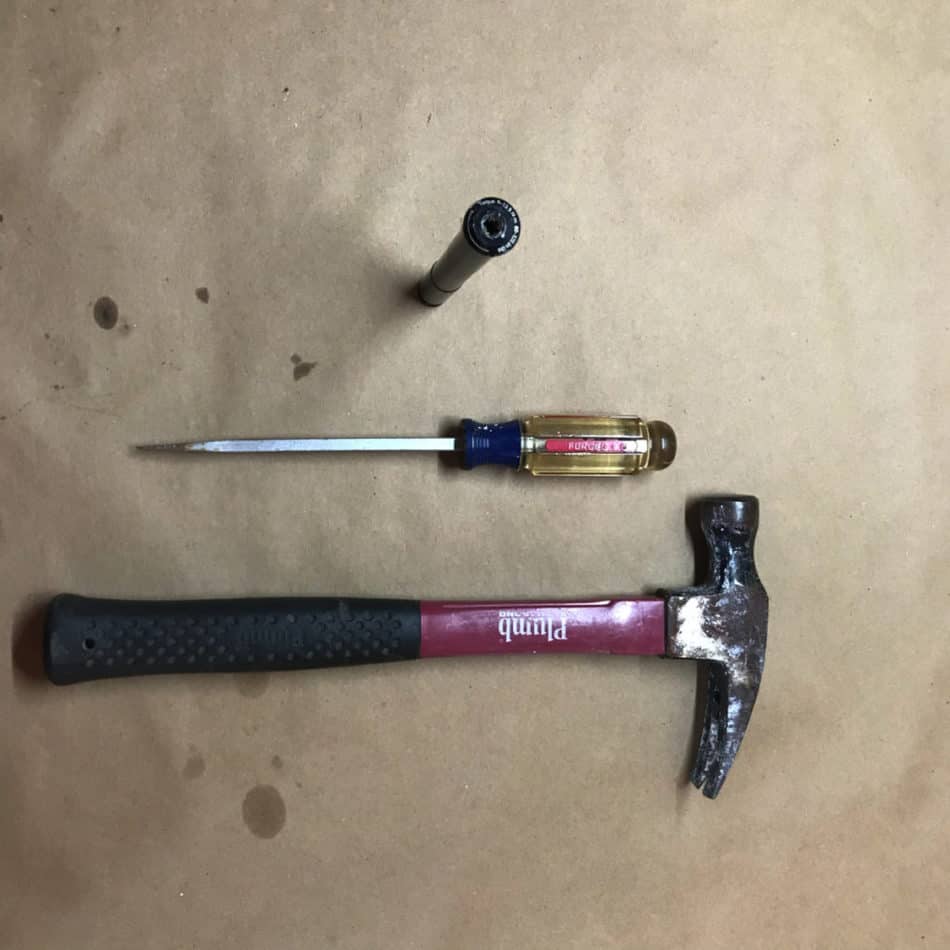
Second, lay the bike down on a hard surface. This is where the old car towels come in as you will have the towels between the fork and the work surface, especially if its concrete. Now by old car towels, I simply mean the towels we have relegated to cleaning the cars instead of using inside anymore.
Third, align the tip of the flat tip screwdriver in the hole on the axle centering as best you can. Once you are happy with the alignment then give it a few good wacks with the hammer.
This is the most nerve-racking part and what took me the longest time as I was very timid being as I didn’t want to screw up the bike. On my third attempt was had finally got frustrated enough that I gave two good connections and the screwdriver was set.
I gently turned the screwdriver counterclockwise to loosen and remove the damaged thru-axle. Now you are set to insert the new axle and get back to riding!
How to fix a loose Mountain Bike Axle
This has only happened once but it was a bit of a scare while out on the trail. I and the guys had just finished riding, and let’s be real here a little Hike a bike as well when I noticed a problem.
As we proceded onto the next trail, (insert trail name here), I noticed that my brakes were fading in and out. After a bit of a panic, I gave a holler to Jason to help me take a look.
The culprit was the rear axle. After a violent trip down Farlows Gap, the rear axle had worked itself out of the frame where it was bolted.
Luckily for me, it was still attached to the frame and resting in the hub of the rear wheel itself. I was also lucky that I was riding with Jason and was able to use his Crankbrothers multi-tool (like this one on amazon) as my multi-tool was back at the campsite.
A quick deep breath and tightening of the rear thru-axle and we were back on our way to finish out (insert trail name here).
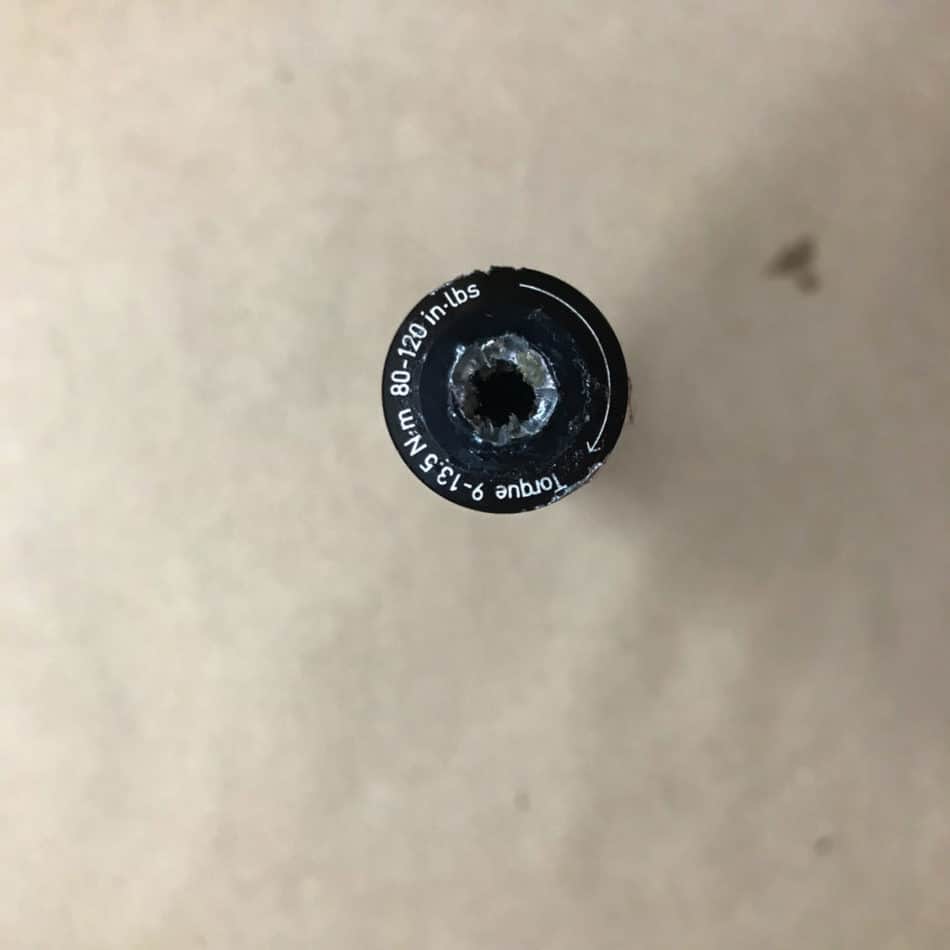
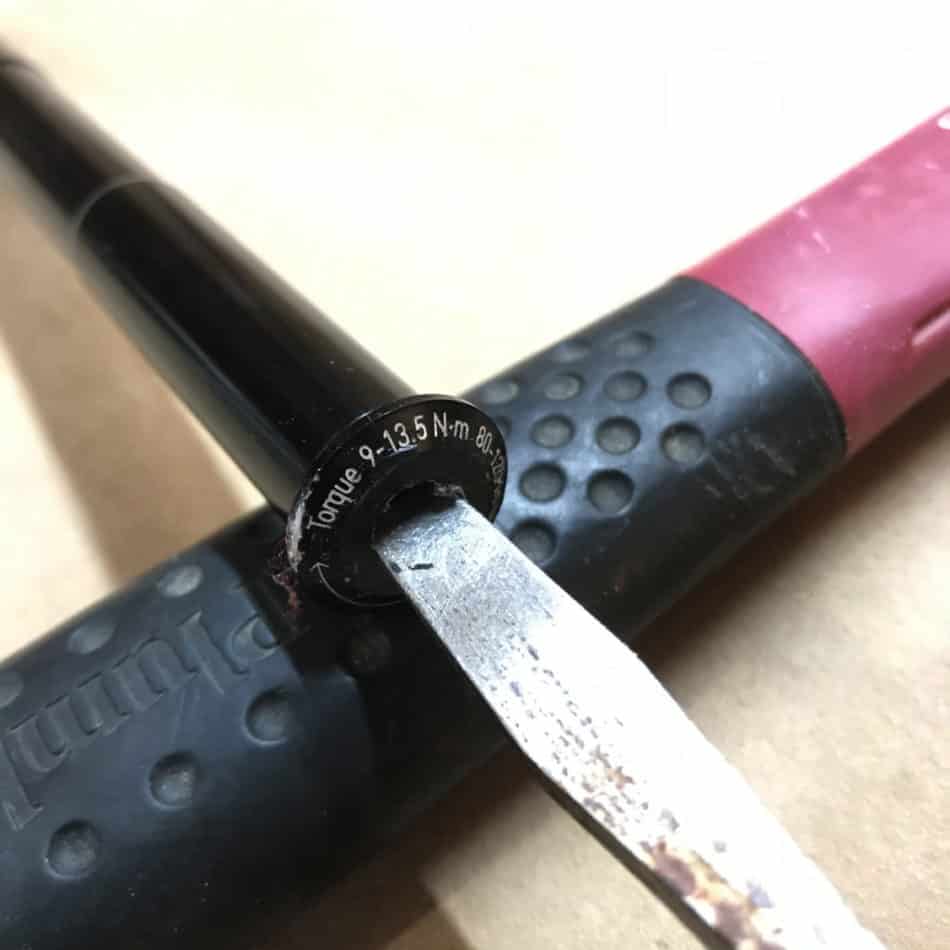
How tight should my Thru-axle be?
This is in reference to the not Quick Release Thru axles. The axle comes with a torque reference that, if you have a torque wrench, you should try to tighten it too.
However, if you don’t have a torque wrench in the shop (or while your out on the trail) simply take your allen key or multi-tool and tighten the axle until you start to feel a bit of resistance.
You want to make sure you don’t crank down too hard on the axle which could lead to a striped head.
How tight should my Quick Release Axle be?
You are going to want to ensure that when you tighten up the QR axle you have a slight mark on the palm of your hand. To much pressure could damage the axle but to little pressure could lead the axle to work itself loose which could be disastrous.
How should I maintain my Axle?
The biggest thing you could do to maintain your axle is simply give it a good cleaning from time to time. You shouldn’t get too much dirt and grime on the axle itself due to its location inside the hub but you want to ensure it is clean when reinserting the axle onto the bike.
Adding a little bit of bike grease like this one from Park Tool like I do helps ensure you don’t damage the threads as you screw in the axle.